Thanks to everybody for supporting the blog. The lastest poll has been a great improvement on the pass, with our most votes ever. In the game we are voting on, you have chosen the Ruy Lopez and the opening. I have also produced the analysis of a game that I won quite simply. I believe that it is a good example of a black victory, turning around white's first turn advantage and taking over the center. To those of you on the mailing list, an additional game analysis will be emailed to you shortly. Also, I would like some games outside the pool of my own to add to this database. I encourage you to email me any game you play online and would like analyzed. If you play chess on RedHotPawn.com, have the site email you with the pgn file of a game and forward it to me.
#001
Date: 1/30/09
White: Frohike
Black: Exeterstreet
CC on RedHotPawn.com
(0-1), 32 moves
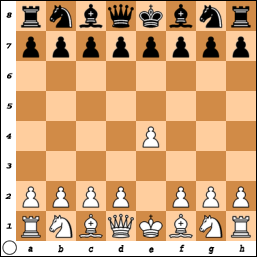
Exeterstreet Database1.Nf3White opens in somewhat of a strange way, with the Reti Opening. This Indian style open isn’t seen as often as most other openings. This opens the game up to be abstract throughout.
1…d5
This is the main continuation of the Reti Opening. Black’s pawn on d5 isn’t threatened by the Knight on f3.
2.Nc3White takes a less common turn with this move. This two Knights development is possibly the most theoretically ideal opening, as it develops pieces and grabs center control fastest, but there are problems when applied.
2…Nc6Black makes a second developing move on the Queenside
3.g3This pawn advancement on the Kingside is not properly placed. White is setting up its formations diagonally on the board from Black. This move has little impact on the center, and White should have made a stronger move, such as d4.
3…Nf6
Black takes advantage of the tempo available and develops his second Knight on the Kingside. This move grabs center control, and evens out Black’s development by making a play on the kingside. This may also play a role in cramping White’s plan for development.
4.e3Once again, White makes a minimal move that does not make enough of a stance. White has lost his lead in time, and is not properly responding to Black’s push for the center.
4…e5This move takes advantage of White’s lack of proper development in the previous move. White is now looking very cramped, with the Queenside bishop locked behind a set of pawns.
5.Bb5This is a better move for White than the previous. White develops his other bishop onto Black’s side of the board, pinning the Knight to the King. This reduces Black’s grasp on d4 and e5, the latter of which is occupied by a pawn which must be defended.
5…Bd6
Black develops a bishop to a post where it defends the pawn on e5. Black is set up for a threat on the White Knight on f3, by moving e4.
6.Be2This is confusing. White breaks an important rule by moving the bishop back and forth, this allows Black more time to work on his plan. This also is an extremely cramped position for White.
6…e4Black mounts the attack mentioned earlier. White’s Knight is now in danger, and must move. Black has control over this game, and is making White respond to his moves.
7.Ng5This is purely a defensive move. Black needs to make a move that forces White to respond to him, again. Black has a strong advantage in terms of piloting the direction of the game, and is in complete control. Unfortunately for White, moving the Knight to g5 will lead to the conquest of the piece. Black has so much spatial dominance that the Knight has nowhere to move safely.
7…0-0
Black takes the opportunity to castle. This also cuts off any escape for the White Knight
8.0-0White follows, taking an opportunity to castle while it doesn’t have to spend the time responding to an attack from Black.
8…h6Black advances a pawn to threaten the doomed Knight on g5. White’s Knight now has nowhere to go.
9.Nf3White moves the piece back to a dangerous location, and Black is lined up to gain 2 material points. With Black’s heavy all-around lead, 2 material points will prove helpful to Black’s plans.
9…exf3Black makes the capture.
10.Bxf3
White makes the obvious capture.
10…Be6Develops white-squared bishop into the game. Now Black’s piece development is complete, and only the rook on a8 and queen on d8 have not moved out yet.
11.d4White builds pawn structure, and claims center control before Black expand into it.
11…Qe7Black brings Queen up to offer more support to his presently placed pieces.
12.b3
White brings forward a pawn on the queenside, and his not properly deflecting Black’s contest for the center. White seems to be giving up the center and focusing on controlling the sides, a position that Black is usually pushed into due to White’s first move advantage. This is a indicator is a strong sign that Black has overtaken White in the opening, and it is fair to say that Black is dominate going into the middle game.
12…Rad8Black has completed absolute development. The Queen has been brought forward to defend developed pieces and the rooks have been moved to the center.
13.Nb5-White tries to make a plunge into Black territory on the Queenside. This attack seems to premature, as White hasn’t claimed enough control in this area to launch an attack.
13…Ne4Black steps forward and begins to contest the Kingside. e4 is a center square that is so heavily dominated by Black that Black uses it as a step up push into White’s space. White is now up against the wall in space, and the rate that Black’s advantage grows is increasing with momentum.
14.Bg2White’s move steps back in space, and does little else.
14…a6
Black tries to push White out of the queenside, and thus totally cripple White’s space and development. More importantly, Black is about to capture material, because White’s knight is in a no retreat situation. White did not have enough control on the queenside to launch an attack, and is about to suffer with another knight lost to this.
15.Nc3White chooses not to take a pawn for his knight, and just give it up to Black’s overwhelming tidal wave.
15…Nxc3Black captures the knight.
16.Qd2White brings out the queen to threaten it.
16…Bb4Black defends with a bishop and sets up a possible revealed attack on the queen. The bishop is defended by a knight on c6.
17.Bb2
White increases pressure on c3, trying to overwhelm and retake the piece that captured his knight previously.
17…Ne4Black returns the knight to safe post of e4, a spot which also attacks the queen. This makes this a double-revealed attack, because the bishop on b4 also attacks the queen.
18.Qd1White retreats back to row 1. Black basically has control of the center and both sides of the board. This, on top of the material lead, is dominating the game.
18…g6Black pushes the pawns forward on the kingside.
19.a3White responds with a pawn-push on the queenside that attacks the Black bishop at the post of b4.
19…Bc3Black decides to make a trade, and finds an opportunity to force it. The bishop pins the White bishop to the rook on a1. The White bishop is also undefended, so White has no other real choice but to make the trade.
20.Bxc3White conceits.
20…Nxc3Black recaptures and attacks Queen on d1.
21.Qd3White moves up queen and tries to fend off the knight.
21…Nb5Knight moves back and threatens White’s queenside pawns.
22.a4White makes the only move that gets the pawn out of danger. This attacks the knight.
22…Bf5
Black brings out a bishop to threaten the queen. This puts off Black’s response to the knight in danger.
23.Qe2White queen moves back, but still threatens the Knight as alongside with the a-pawn.
23…Nc3Black makes continued threats on the queen, and again pushes into White’s territory relentlessly.
24.Qd2White continues to respond Black’s attacks by trying to expel his presence.
24…Ne4Black returns to a safe spot that attacks the queen. Black is playing with an exact placement in order to find a strong attack to penetrate the defense and win the king.
25.Qc1White responds with a retreat to the back row, once again.
25…Nc3Black tries again to return to an unstable square, and is not making much improvement at trying to steer into the endgame.
26.Qe1White stays on the back row this time, and hopefully this will be the end of the repeating moves.
26…Ne4Black returns to the safe post of e4, this time without a threat involved.
27.c3White now tries something new and moves forward with the pawn structure.
27…b5
Black contests the pawn development with a pawn advance of his own.
28.axb5White makes a capture in the pawn faceoff, threatening the Black knight on c6.
28…axb5Black recaptures.
29.b4White pushes up.
29…Ra8Black makes a trade of the rooks available.
30.Qe2?
White makes a questionable move. This move allows an attack on c3 with the knight on e4, which would also defend the pawn on b5.
30…Nxc3Black takes the opportunity to win a pawn.
31.Qd2White makes an attack on the knight on c3.
31…Qxb4Black takes the opportunity to capture another pawn and push in with his queen.
32.Bxd5?White makes another mistake, and in a moment of desperation, trades a bishop for a pawn.
32…Nxd5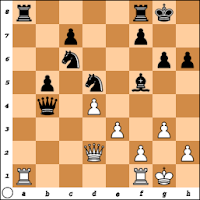
Black recaptures with a move that defends the Black queen and opens up a trade of the queens. After this move, White resigns, seeing that the game is lost, and victory seems impossible.